Home DIY: Get Rid of Stain (Limescale) in a Kettle without Wasting Water
- Rick

- Nov 1, 2023
- 4 min read
Updated: Sep 23, 2025
What are those brown-coloured stains inside an electric kettle that looks like rust?
It is called "limescale" and is formed as a result of boiling water that contains some minerals that reacted to heat. Limescale is mainly comprised of calcium carbonate and the amount is ultra-little and generally harmless to the body.
In fact, calcium carbonate is often used in dietary supplement for healthy bones, muscles and hearts and also used as antacid to relieve heartburn and acid indigestion, but they are usually white in colour. Limescale does not have the volume to achieve those benefits thought, and in most cases, limescale are oxidised.
If limescale is harmless, why bother to remove it?
If the rust-like stain in a kettle does not look disgusting to you, then let it be. However, limescale that is deposited on the kettle's metallic heating element reduces its heating efficiency, thus, more energy will be required to boil a kettle of water. That means your electricity bills will go up.
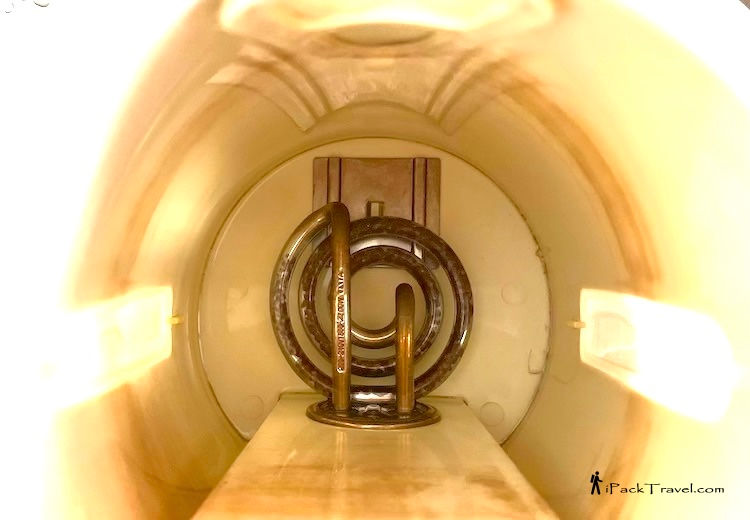
Take a closer look at the heating element after more than two months of use — oh, cleaning should be done once a month but I deliberately prolonged it for another month to show the effect of the limescale.

You can find many websites providing methods on how to get rid of limescale in a kettle, so I will not delve into that. I will simply focus on the only method that I found to be the easiest and cheapest, which I have been using for many years. In addition, I will reuse the water from the cleaning process for other purposes, so as not to waste a kettle-full of water.
Daily Use
In order for the method to be truly effective, there is just one thing to take note. During daily usage of the kettle to boil water, do not fill it till the kettle's FULL-level mark — about half a finger gap below the mark will do. This will keep the forming of limescale below the FULL-level mark.

The Cleaning
Step 1: A bottle of concentrated lime / lemon juice (citrus acid) will be needed for cleaning the kettle. One small bottle of 500 ml can be used for roughly 12 times — provided it is not used for making lemonade drinks. I find this to be much cheaper than getting fresh limes or lemons, which are usually sold in packs or by weight and cannot be kept in the fridge for months.

Step 2: Pour roughly about 2 tablespoons of the lime / lemon juice (depending on the size of the kettle and also the concentration of the acidic juice) into the kettle. I use the grooves on the bottle as markers.
Step 3: Fill the kettle with water till the FULL-level mark. The brown stains should all be below the water level. Do not go over the FULL-level mark as hot water may spill out of the kettle during boiling.

Step 4: Put the electric kettle to boil. It is safer to let the water boil fully than to peek inside to check the progress when it is boiling — the 100°C hot steam can cause second-degree burns.
Note that limescale can still be removed without boiling the water with lime / lemon juice, but some stains may still be present in crevices. Boiling can achieve better results.
Once the boiling is completed, the cleaning is done! In my case, one cleaning can last at least a month. And by doing regular cleaning, I won't have to see any stains at all.
After the cleaning, the brown stains are no longer there. Another advise: Do NOT scrub the interior as any scratched surface will tend to accumulate more limescale later on and making it harder to clean.

And the metal heating element will be as shiny as before. Compare the photos before and after cleaning and you can see the great difference. Notice that there are still dark stains in crevices and some scratches? This is the reason why I choose not to scrub the interior.

Try out this method and see the result for yourself.
This method can also be applied to electric airpots and coffee machines. Using citrus acid from edible lime or lemon is far safer than using non-edible chemicals — not to mention the need to wash the equipments again with more water after cleaning to remove any residue of the cleaning agent itself.
Next, what to do with the kettle of hot citrus water after cleaning?
Method 1: Water Reuse
This is how I reuse the hot lime water from the cleaning process instead of pouring it away. Gather some soiled hand towels and face towels in a water container, pour the hot water on them and let the towels soak for a while. This is a good way to kill any germs and bacterias on the towels that are used to wipe the hands and face.
After the water cooled, wring the water out of the towels and put the towels to wash in the washing machine with other clothes. As for the remaining water in the container, it will be used to flush the toilet. That will be three uses for a kettle-full of water!

Method 2: Make Hot Lemonade
This is an alternative to avoid wasting a kettle-full of hot lime water after cleaning — by drinking it! 🤣
I'm not kidding. This is the same as adding slices of lemon to drinking water, but I boil it before drinking.
The water is still drinkable after cleaning, just that the concentration of calcium carbonate in it may be slightly higher — but, that is for the case when the cleaning is done after two months of residue accumulation. If the "cleaning" is done more frequently, like once every 2-3 week, by making hot lime beverage to drink, the cleaning process becomes transparent. And there will be no wastage of water.

In summary, if I can remember to clean the kettle after 2-3 weeks of use, before the interior of the kettle can turn brownish, I will make hot lemonade (with fresh lemon) to drink. If I clean the kettle after the heating element has already turned brown, I will use the hot lime water to clean towels or other metallic pots, pans, glass jars, coffee cups, etc, with similar stains.


Yes, just as you say, l used the juice of a half a lemon. Thanks for the tip 👍🏼
Thank you so much for this tip ! Works like a charm, my kettle was a dark brown inside, looks brand new. Amazing !!